
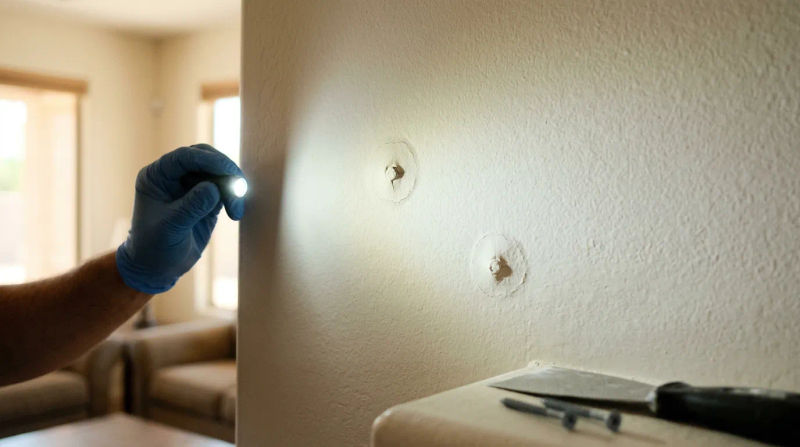
You’re relaxing in your living room when you notice it - a small, round bump on the wall that wasn’t there before. Or maybe it’s a tiny, circular crack that seems to have appeared overnight. My first piece of advice? Don’t panic. Here in Sahuarita, especially as we move into the drier months of September and October, these little imperfections are incredibly common. What you’re likely seeing isn’t a sign of a major structural problem, but a classic case of drywall nail pops.
Over my decade of working in homes across Southern Arizona, I’ve seen countless homeowners worry about these blemishes. They often look like a flaw in the paint or the beginning of a serious crack. But in most cases, they are a predictable, and fixable, part of a house settling into our unique desert climate. Understanding what causes them is the first step to knowing how to deal with them for good.
Common Signs and Symptoms
Distinguishing between a harmless nail pop and a crack that signals a bigger issue is key. When my team and I investigate these Sahuarita drywall bumps, we look for a specific set of clues. Here are the tell-tale signs that you’re dealing with a simple nail or screw pop.
- A Distinct, Raised Circle: The most common sign is a small, perfectly round bump pushing the paint outward. It might be about the size of a dime or smaller. This is the head of the nail or screw pushing against the paper and mud of the drywall finish.
- A Tiny Circular Crack: Sometimes, instead of a solid bump, the pressure from the fastener head will create a perfect, hairline crack around its perimeter. The key is the shape; it follows the circular outline of the fastener head, which is very different from a jagged, stress-related crack.
- They Appear in Lines: Drywall is attached to wooden studs that are typically spaced 16 or 24 inches apart. If you see several of these bumps or circles appearing in a straight line, either vertically on a wall or horizontally across a ceiling, you can be confident they are just marking the stud locations. This is one of the clearest indicators in the nail pops vs cracks debate.
- The Surface is Pushed Out, Not In: A nail pop is a result of the fastener head pushing the surface outward. A hole or dent, on the other hand, would be sunken inward. This distinction is important. Gently run your hand over the spot; you should feel a distinct protrusion.
- It Feels Solid When Tapped: Gently tap on the bump. It should feel solid, not hollow or soft. A soft spot could indicate moisture damage, which is a completely different and more urgent problem. The solid feel tells you the drywall is still firmly attached right next to the popped fastener.
- They Are More Common on Ceilings: While they can happen anywhere, nail pops are frequently more noticeable on ceilings. This is partly due to gravity and partly due to "truss uplift," a phenomenon where the wooden trusses that form your roof structure can arch and move slightly with changes in temperature and humidity, putting pressure on the ceiling drywall.
If the blemish on your wall doesn’t fit these descriptions - if it’s a long, jagged crack running diagonally from a door frame, for example, or if it’s accompanied by water staining - then you may be looking at a more significant issue.
What Causes This Problem
The root cause of most drywall nail pops is simple: wood movement. Specifically, it’s the framing lumber behind your walls shrinking as it dries.
Many homes in the Sahuarita area were built during the housing boom of the 1990s and 2000s. During this period of rapid construction, the lumber used for framing often had a higher moisture content than it would after acclimating for years inside a finished home. Our intensely dry Arizona climate is very effective at pulling that remaining moisture out of the wood.
Here’s the mechanical process I explain to homeowners: a sheet of drywall is fastened tightly against a wooden stud with nails or screws. Over time, that stud dries out and shrinks slightly - even just a fraction of an inch. As the stud shrinks, it pulls away from the back of the drywall. The nail or screw, however, is embedded in the wood and tries to go with it. But its head is on the other side of the drywall, covered by a thin layer of joint compound and paint. The result? The fastener head stays put while the wood recedes, effectively "popping" the finish and creating that tell-tale bump.
This process is accelerated by our seasonal weather patterns. The shift toward cooler nights and the incredibly low humidity of early fall create the perfect conditions for dry air drywall movement. This final bit of drying can cause a nail that has been slowly working its way out to finally become visible. You didn’t do anything to cause it; the house is just breathing and settling into its environment.
When to Call a Professional
So, you’ve identified a few nail pops. What’s next? Can you fix it yourself, or do you need to call for help?
A Good DIY Project If:
You have one or two isolated pops and you're comfortable with a multi-step repair. A common mistake is to simply spackle over the bump. This is a temporary fix at best; the pop will almost certainly return because the underlying fastener is still loose.
The correct repair involves a bit more work:
- Drive a new drywall screw about an inch or two above or below the popped fastener to re-secure the drywall sheet to the stud.
- Either remove the old popped nail/screw or use a hammer to drive it deeper into the stud, creating a slight dimple.
- Apply a few thin coats of joint compound over the new screw and the dimple, sanding lightly between coats.
- Prime the patched area, then re-texture it to match the surrounding wall before painting.
When to Call for Help: While a single pop can be a manageable DIY task, there are times when calling an experienced professional is the smarter move.
- You have many pops: If you’re seeing dozens of Sahuarita drywall bumps appearing throughout your home, it’s worth having a professional assess the situation and provide an efficient, lasting repair for all of them.
- The pops keep returning: If you’ve patched a spot before and it has come back, it means the drywall wasn't properly re-secured. A pro will know how to fix it so it doesn't happen a third time.
- You're not confident with texturing: Matching wall texture is an art. If done poorly, the patch can be more of an eyesore than the original pop. Professionals have the tools and experience to blend the repair seamlessly.
- You have better things to do: A proper drywall repair is a multi-day process involving drying time between coats. My team can often tackle these jobs far more efficiently, saving you time and hassle.
Conclusion
Those little bumps and circles on your walls are usually nothing to lose sleep over. In most Sahuarita homes, especially those built in the last few decades, they are a normal sign of the house's wood frame adjusting to our dry desert air. Understanding the difference between simple drywall nail pops and more serious structural cracks can save you a lot of unnecessary worry.
The most important takeaway is to ensure the repair is done correctly. Simply covering the blemish is like putting a bandage on a problem that needs a stitch. By re-securing the drywall and properly patching the area, you can achieve a permanent, invisible repair.
If you notice any of these signs and aren't sure how to proceed, don't hesitate. Contact a local Handyman professional for an inspection. It’s always better to get an expert opinion and address these minor issues before they become a bigger frustration.